top of page
Remote filming setup options
It has been a revelation to experience how well remote filming works, becoming now my default mode of filming. The transmission and connection are just as powerful as if we were in person. Herewith the setup options for the recording process.

Option A:
Recording From Laptop/Desktop Webcam - Medium Quality

Leveraging new tools for improved remote recording quality with Squadcast (i.e. significantly better than Zoom):
Installation Options:
-
Desktop Webcam
-
Laptop Webcam
You will be sent a special Squadcast link (as an alternative to Zoom)
This is the most simple of the remote recording options, with very reasonable quality.
-
Positioning of the camera however is important, to have a close framed shot and the then raise your computer to have the lens of webcam at your eye-level....
-
Following the guidelines below for the lighting, background and noise levels will all improve the final result.
-
I will simply send you a Squadcast link for the allotted timeslot, and the recording and uploading of the recording is automatically taken care of.
Principle setup guidelines
-
Background: Sitting ideally in front of a neutral background (clear wall or even ideally a black backdrop)
-
Lighting: Having a natural source of light ideally at 45deg to 90deg to one side (therefore lighting up the front and side)
-
Noises: Checking that there are no background humming noises (like a fridge) / interferences.

Option B:
Additional Higher Quality Option - Using Your Laptop AND Smartphone
Using a laptop for the live connection (Squadcast), and your smartphone/tablet for local selfie video recording
-
Local Video Recording: Smartphones or iPads / tablets are almost universally better quality than average laptop webcams (720p - 1080p).
-
If filming from a smartphone, best make sure it's in Airplane mode, to avoid network interference with the microphone.
-
Filming settings (these are often already the default on the smartphones): 16:9 ratio; 1080p resolution; 25 to 30 fps (frames per second)
-
Please see if you can check there's enough memory card space to record for ideally 1hr
-
And full battery charge
-
-
Tripod / Devices Positioning: A means of positioning your camera next to the device running the Zoom sessionn (e.g. laptop).
-
Line of eyesight: Positioning such that, as you are looking at my image on Zoom, you are looking just very slightly to the side of the lens of the camera.
-
Vertical position: Please position the lens at the same height of your eyes, so that you are not looking down into the lens.
-
-
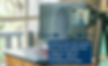
The photo here above shows my setup when wanting to use the higher definition back lens (if you have someone to help you position the frame of the phone when you sit down).
-
Smartphone: It is also just as good to use the selfie front camera on your smartphone, so you can see yourself to adjust your position in the frame.
-
Please be sure to have the smartphone in landscape orientation.
-
-
You can also prop the smartphone on the screen/keyboard if using a laptop, being sure that they are at the same vertical height as your eyes.
-
-
Microphone: In fact even the mobile phone in-built mics are good enough quality...no special need for a lapel mic unless you happen to have one.


If using your smartphone in this Option B setup, please check that your smartphone is ready for a 1h-1h30 recording


bottom of page